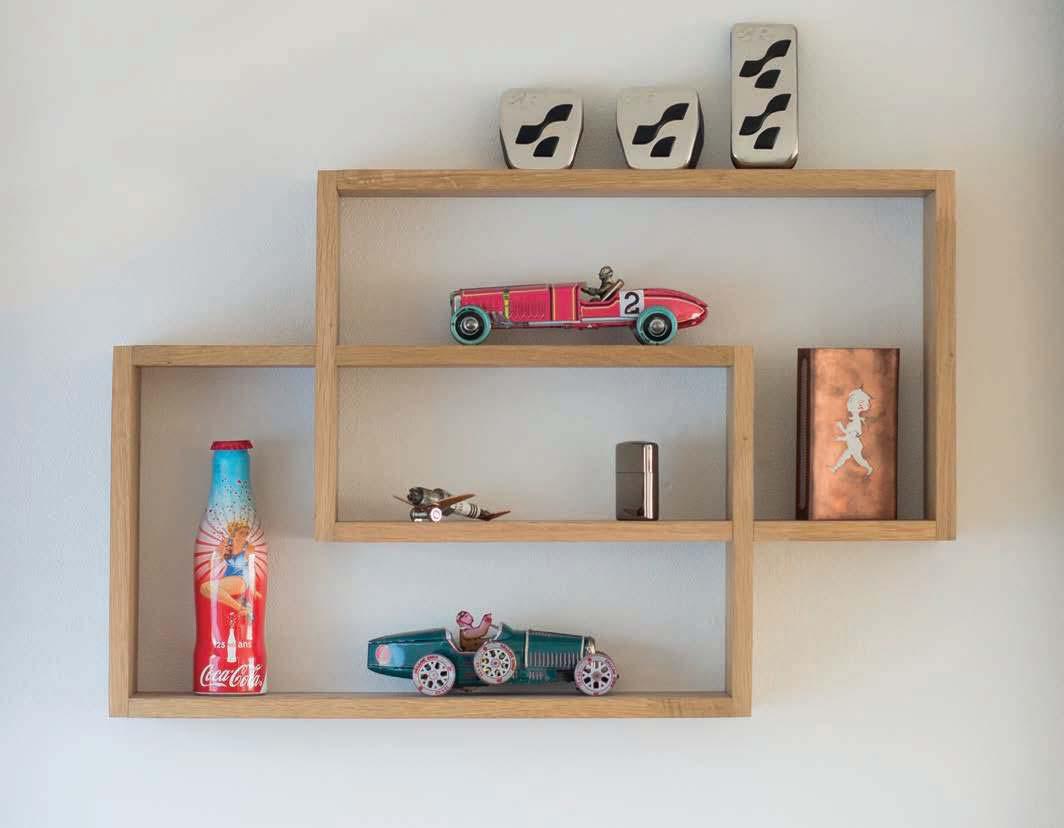
I am what you in Swedish would call a "prylkille". If one would directly translate the word it would be stuff guy, meaning that I like collecting lots of different things. To display some of my stuff, my mom and I made a big Massironi shelf a while back. However, this one is now full, which is why I decided to make another shelf.
I wanted the shelf to stand out and be able to store different things, which is why I designed the shelf in this particular way. Since I like symmetry, the shelf consists of two parts, out of which the second part of the shelf is shifted by 25 percentage.
In this article, I will walk you through my process of making this particular shelf, as well as providing you with the necessary information tools to redesign and make your own shelf.
What you will need
These are the following materials and tools that I used for creating the shelf:
Materials:
- Wood (1500 x 200 x 12mm)
- Wood glue
- Wood dust
Tools:
- Ruler
- Plainer
- Saw
- Sander
- Sandpaper
- Wax
- Brackets
Step-by-step guide
Step 1: My design
You will see the drawings for the design that I created. If you want to use this design, either print it or use the template to draw these onto the planks.
Step 2: Your design?
Do you want a bigger shelf? Maybe you want to shift it more than 25% as I did? If that is the case get your paper and pen or a CAD software and get designing.
Bu hikaye The Home Handyman dergisinin March/April 2023 sayısından alınmıştır.
Start your 7-day Magzter GOLD free trial to access thousands of curated premium stories, and 9,000+ magazines and newspapers.
Already a subscriber ? Giriş Yap
Bu hikaye The Home Handyman dergisinin March/April 2023 sayısından alınmıştır.
Start your 7-day Magzter GOLD free trial to access thousands of curated premium stories, and 9,000+ magazines and newspapers.
Already a subscriber? Giriş Yap

UPGRADING home security
When it comes to home security, doors, locks, and handles are your first line of defence.
CEILING ELEGANCE
All you need to know about cornices and crown moulding.

8 DIY MYTHS YOU SHOULD STOP BELIEVING
DIY can seem intimidating, especially if you’re new to it or have heard some of the common myths that discourage people from trying their hand at it. But don’t let these misconceptions hold you back! Here are 8 DIY myths you should stop believing and the truth behind them.
WINDOW WONDERLAND
Windows are more than just functional parts of a home they're key design elements that influence your comfort, security, and energy efficiency.

CONCRETE CREATIONS: A guide to working with cement
With the right tools, techniques, and a little know-how, working with cement can be straightforward and incredibly rewarding.

HOW TO CARVE A WOODEN BIRD
Do you love nature and its beautiful creatures? Are you passionate about wood carving and want to combine the two? If so, you're in the right place! In this article, we'll show you how to carve a wooden bird that captures the beauty of nature and provides a satisfying creative outlet.
SHELF-INDULGENCE
Free-standing shelves are a versatile solution for tidying up almost any space. Whether it's your desk, kitchen, workshop, craft room, children's room, or even a spot for plants, these shelves can help you organise and declutter.
RACK IT UP
If you've ever wanted to create a custom shelf that combines industrial style with functionality, this project is for you! Using metal tubing and wood, you'll build a robust shelving unit perfect for organising your space.
BUILDING A SIMPLE KITCHEN BENCH
I needed a kitchen bench, so I built one... When you're in need of furniture but don't want to spend a fortune, building it yourself can be both a cost-effective and satisfying solution.
SIT HAPPENS
An ergonomic kneeling chair is a practical and stylish solution for anyone who spends long hours working at a desk.