
Gå ubegrenset med Magzter GOLD
Få ubegrenset tilgang til over 9000 magasiner, aviser og premiumhistorier for bare
Prøve GULL - Gratis
CREATE A PROCEDURAL STROKE IN SIDEFX HOUDINI
3D World UK
|July 2023
Discover the pro method behind the paint stroke elements from our special 300th issue cover
-

In this beginner-level tutorial, you'll learn how to create the paint stroke elements that make up the hero typography of this issue's cover image.
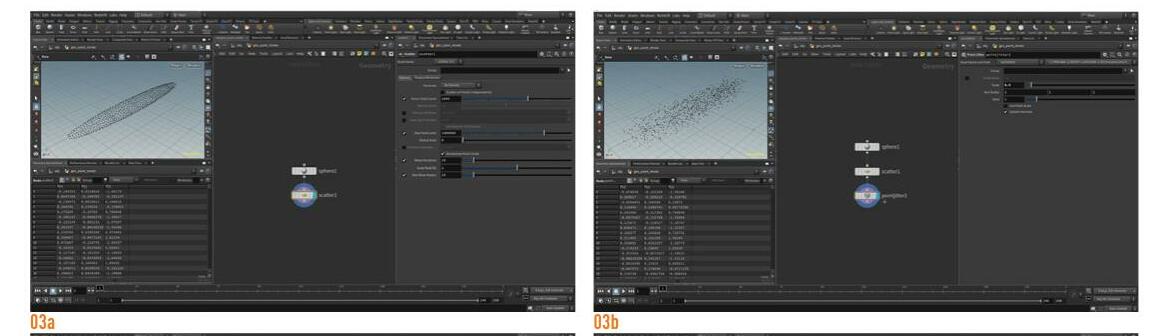
Modelling the base element using scattering and various VDB operations, we'll then deform this base element using Houdini's powerful Path Deform SOP to bring the strokes into the dynamic shapes we need to create our design.
Along the way, you'll also learn how to create two custom tools using a little VEX, which may even get you hooked on coding! We'll create dynamic groups, employ procedural and manual placement techniques, look at various ways to create randomness, and also add in some colour controls on scene level, so you don't have to jump into the various geometry objects to make colour changes during art directing.
We'll end up with a flexible setup that you can vary by using different input curves, and gives you a great head start on your journey to learning Houdini!
01 CREATE A GEOMETRY NODE
To get started, press the Tab key over the Network view and Geometry node, which will contain the base element that we'll deform later on. Click on the name of the node and rename it to something descriptive like 'geo_paint_stroke'.
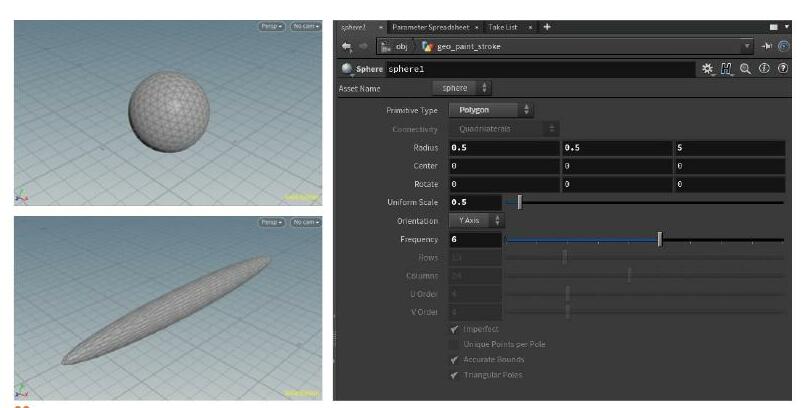
02 MAKE AND MODIFY A SPHERE
Using the Tab key, create a sphere that will be our base shape. Change the Primitive Type to Polygon and the Frequency to around 6 so the sphere is a bit more subdivided. Now change the Uniform Scale parameter of the sphere to 0.5 and the Z-component of the Radius parameter to 5.

Denne historien er fra July 2023-utgaven av 3D World UK.
Abonner på Magzter GOLD for å få tilgang til tusenvis av kuraterte premiumhistorier og over 9000 magasiner og aviser.
Allerede abonnent? Logg på
FLERE HISTORIER FRA 3D World UK

3D World UK
Nvidia GeForce RTX 4080 Super Founders Edition
On the surface, the GeForce RTX 4080 Super is barely any different from the vanilla GeForce RTX 4080 that was launched in 2022.
1 mins
December 2024

3D World UK
MCU VFX moments
Pros choose their favourite CG shots from the Marvel Cinematic Universe
4 mins
December 2024

3D World UK
Nosing around on Fallout
We sniff out the story of how FutureWorks brought The Ghoul to life with the creation of his iconic noseless face
4 mins
December 2024

3D World UK
DISCOVER RED GIANT GEO'S HANDY TOOLS
Heather Sterland introduces one of the newest additions to Maxon's suite of Red Giant VFX plugins with an atmospheric lunar creation
4 mins
December 2024

3D World UK
BUILD AND ANIMATE A FUN-FILLED ROBOT
Expand your horizons with Julio Benavides, who reveals his workflow for creating a charming hard-surface character
4 mins
December 2024

3D World UK
DESIGN STRIKING SCULPTS AT SPEED
Learn how to build 3D characters that balance visual quality and efficient workflow with pro advice from Oh Holy Mary
4 mins
December 2024

3D World UK
CREATE A CANYON ENVIRONMENT
Build a stunning desert setting with an expert walkthrough from Romain Eboli, who uses high-quality Quixel assets
4 mins
December 2024

3D World UK
TURN A 2D CONCEPT INTO AN INCREDIBLE 3D-PRINTED FIGURE
Concept artist Emily Chapman shares her process for sculpting, printing and painting an outstanding model to put on display
8 mins
December 2024

3D World UK
Goodbye SAIGON
Trevor Hogg gets held captive by multiple versions of Robert Downey Jr.while uncovering the visual effects of HBO's spy series The Sympathizer
5 mins
December 2024

3D World UK
IMPRESSIONISTIC REALISM
Trevor Hogg learns how the artisan aesthetic came to be for The Wild Robot
6 mins
December 2024
Translate
Change font size